|
|
|
|
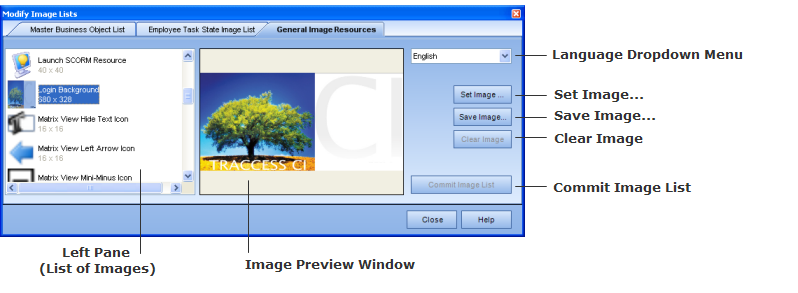
The General Image Resources tab, as explained in the screenshot below, contains a list of icons and images used in TRACCESS CI. Some of these images can be changed to more adequately represent your company. Most of the images, however, are icon graphics connected to a function in the application. Because changing these images can have a significant effect on the functionality of the application (not to mention, these changes will not be reflected in the help files), please read the precautionary note on the Modify Image Lists page before making any changes.
Below, you will find instructions on changing the look of TRACCESS CI to reflect your company.
Language Dropdown Menu: Choose a language from this dropdown menu to customize images for specific languages.
Set Image... : Allows you to set a new image.
Save Image... : Allows you to save the current image to your computer (recommended, since you cannot revert back to a previous image).
Clear Image: Clears the current image (only available on some images).
Commit Image List: Saves the new image(s) you have set.
Left Pane (List of images): Displays the list of General Image Resources images.
Image Preview Window: Displays the selected image from the Left Pane or shows a preview of the new image selected.
TRACCESS CI can be customized to more adequately reflect your company. These images are not linked to a functionality and can be changed without having an affect on the functionality of the application or the help files. There are five images in the General Image Resources list that will allow you to do this:
These images can be changed for each installed language—English, French, Spanish, Thai, etc., can have their own images. If you change the images, there is no button to revert back to the previous image. It is recommended that you save the image with the Save Image... button before you change an image.
Please Note: Simply logging out of the application and logging back in will not reflect the changes. The application must be closed completely before the changes will be reflected on screen.
Each image has its own specifications and features to be aware of. Ensure that your replacement image matches the size and transparency of the default image.
The dimensions of the login background image must be 682 x 330 pixels. If a larger image is inserted, it will be cropped. If a smaller image is inserted, it will be tiled.
The dimensions of the blank employee picture are 150 x 200 pixels. If a smaller image is inserted, it will be stretched to fit the width of field. If a larger image is inserted, it will be compressed to fit the width of the field.
The report header image is fully customizable, allowing you to change both the left and right side of the header. When there is no image, the area appears black.
Clicking on Set image... allows you to choose a new graphic, such as the logo of your company. In the image below, you can see that the logo, "Universal Enterprises," does not fit the recommended size specifications. Black was added (which can done in an external program) to make up the size. The same can be done with the right-side header image.
![]()
Below is an example of a report header. The right header displays the new company logo, and the right side display the TRACCESS CI logo.

Note: Your new images will only appear in new reports your generate. Any previously generated reports will contain the old images.
The left image must be 191 x 41 pixels. If a larger image is inserted, it will be compressed to fit the width of the field. If a smaller image is inserted, it will be stretched to fit the width of the field.
The right-side image must be 144 x 36 pixels. If a larger image is inserted, it will be compressed to fit the width of the field. If a smaller image is inserted, it will be stretched to fit the width of the field.
Additional Help:
Change the Report Header Custom Image: Step-by-step Instructions
|
|
|
|