|
|
|
|
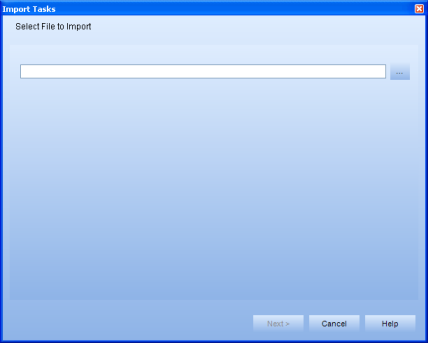
Select Maintenance > Batch Processing >Import tasks. The Import Tasks Wizard appears, displaying the Select File to Import page.

Click on the ellipsis (...) button. A browse dialog appears.
Select the BIN file containing your exported tasks and click Open. The file path now appears to the left of the ellipsis button. (If you do not have an export file, refer to Exporting Tasks.)
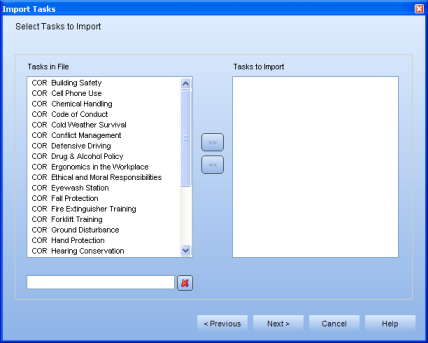
Click Next >. The Select Task to Import page appears.

Click on a task you want to import, then click the >> button. The task appears in the Tasks to Import list. Continue to add as many tasks as needed.
Use these tips to add multiple tasks at a time:
- Select a range of tasks by holding down <Shift> and left-clicking on the first task you want to export. While still holding <Shift>, scroll down and click on the last task you want to include.
- Select multiple tasks in different places in the list by holding down <Ctrl> and left-clicking on the tasks you want to include. Deselect a task by clicking on it again (while holding <Ctrl>.
- Select the entire task list by clicking any where in the Available Tasks list and then pressing <Ctrl + A> on your keyboard.
(Optional) Refine the task list by typing in letters or words. Click the "X" button to clear the search field.
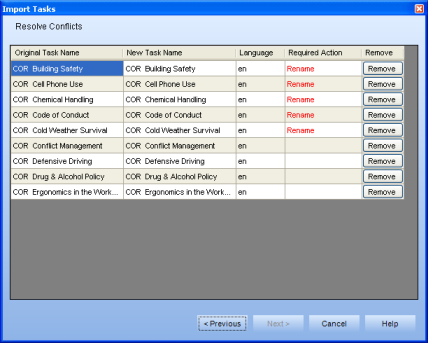
Click Next >. The Resolve Conflicts dialog appears.

Look at the Required Action column. The tasks that need to renamed are indicated. Click on a task name under the New Task Name column. The task appears in edit mode. Type in a new name and press <Enter>. When all conflicts are resolved the Next > button is enabled.
Click Next >.
A dialog appears asking if you want to import your tasks now. Click Yes to import your tasks. A Summary page appears.
(Optional) Click Save to save your summary report as a .TXT file.
Click Finish to close the Summary page.
Your import is now complete.
Additional Help:
Interpret Task Export/Import (Detailed help in importing tasks)