 located on the Quick Access Bar located in the top-left corner of your TRACCESS screen. You can access your schedule no matter where you are in TRACCESS.
|
|
|
|
- Click here about the Schedule for Org Units -
Navigating and Understanding Your Schedule
Editing or Viewing an Activity
Adding Milestones to Activities
The Occupational Development Schedule is designed to help Learners plan out their learning and keep track of career progression in a well-organized format. Learners can add any assigned learning or custom activities to their schedule and keep track of these activities by setting dates and adding different types reminders, called milestones. Supervisors can also add activities to a Learner's schedule and can assist the Learner in planning and career progression. Activities may also be added by managers at an Org Unit level—these activities appear as read-only and cannot be modified by the Learner.
The schedule is accessed by selecting the Schedule icon  located on the Quick Access Bar located in the top-left corner of your TRACCESS screen. You can access your schedule no matter where you are in TRACCESS.

Once you have accessed your schedule, it is displayed in its own window. You use your schedule by adding activities and milestones. Activities can be either a Process or a Task from your assigned learning, or they can be your own custom created activities. Milestones can then be added to activities, which work as reminders of significant time periods related to the activity.
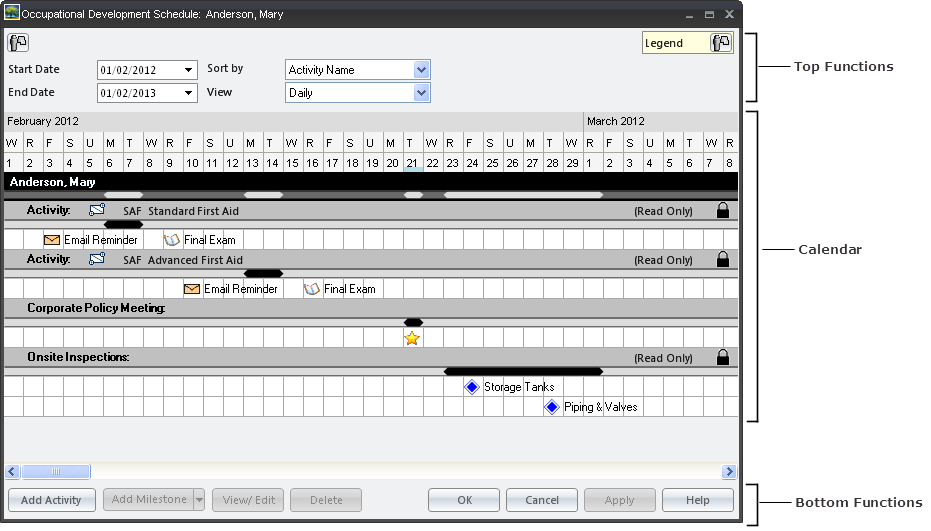
You view and manage your schedule by using the schedule's functions, as explained below:
click image to enlarge - double-click to resize

Start Date & End Date: Determines what dates are displayed in the calendar area.
Sort by: Sorts activities by activity name, start date, end date, priority, or creation date.
View: Displays activity calendar in a daily or monthly view.
Legend: A mouse-over reveals a legend of all possible schedule icons.
Print: Allows you to print out your schedule.
Displays your scheduled activities, including milestones and email milestones.
Month/Day Bar: This is the very top of the calendar area, which shows you what time period you are looking at. If a the Monthly view is chosen, the month and year is displayed; if the Daily view is chosen, all the days in a month are displayed.
Activity: Activities are displayed in your schedule. If they haven't been given a unique name, they will appear as "Activity" by default. The activity will show the Task name if it is associated with a Task.
Activity (Read-Only): You may notice activities that are read-only and indicated with a lock icon. These activities have been added by a manager at an Org Unit level and cannot be modified.
Milestone: You may see any number of milestones below an activity. These milestones may be email reminders or significant time periods.
Add Activity: Allows you to add an activity. This includes any assigned learning: processes, process sets, and/or tasks).
Add Milestone: Allows you to add a milestone (custom), duration milestone, or email milestone.
View/Edit: Allows you to view and/or edit an activities properties.
Delete: Deletes the activity from your schedule.
Apply: Saves any changes you made without closing the Schedule window.
Two types of Activities can be added to the schedule: learning and custom. They behave in similar ways, except that a learning activity is associated with a Process or Task in your assigned learning. These are both added to your schedule in the same way by clicking the Add Activity button.
Step-by-step instructions on adding activities is available on the Adding Activities to My Schedule page.
To view an activity's details or to edit its properties, simply click on the activity and then on the View/Edit button, or right-click on the activity and click Edit. The Activities dialog appears. From here, you can:
Change the name of the activity
Change the start and end date
Change the priority level
Select a different type of learning
Read notes and add notes
Note: If you cannot edit the activity, it has been added by your supervisor or at an Org Unit level by management and is read-only.
The icons representing your activities and milestones in your schedule are interactive. You can change the date of an item by clicking on it's icon and simply dragging it left or right to a new date.
Change the date range of an item by placing your cursor at the end of an item until your cursor turns into a double arrow, then click and drag the item to the desired date. The item will then span over the new dates you have selected.
A milestone is any significant time or date such as a deadline date. Milestones are especially useful to add to an activity because they work as helpful reminders. There are three options for milestones:
Milestone - Any significant date. Examples include deadlines, final exams, appointments.
Duration Milestone - Same as a milestone, except it spans over more than one day
Email Milestone - Automatically sends an email message to the learner as a reminder of an upcoming date.
The icons for milestones and duration milestones can be changed by clicking on the View/Edit button.
Visit this page for step-by-step instructions about adding milestones.
Additional Help:
Adding Activities and Milestones to My Schedule