
|
|
|
|
The Add/Remove dialog is used in many places in the system to add and remove items to and from an object. This can be adding and/or removing Employees to/from an Organization Unit, Tasks for a Sub Process, and Resources for a Task. Although the content of the dialog differs, the functionality is the same, as outlined below.
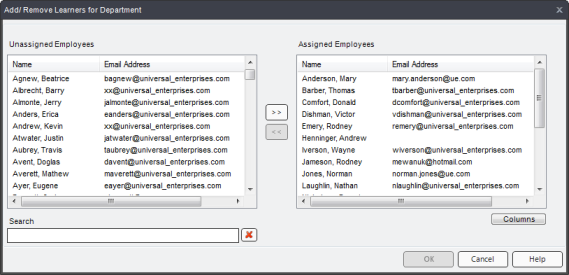
Left Box - The left box lists all of the Employees, Tasks, or Resources available to add or assign. What you see in this list will depend on your role, your assigned Org Units, and your permissions.
Right Box - The right box lists the Employees, Tasks, or Resources that currently exist or have been assigned.
Add/Remove Buttons - Select an item from the left or right box, then click the Add >> or Remove << buttons
Search - Enter a keyword(s) to filter your results. Click the X to clear the search field.
Columns - Click the Columns button to open a dialog that displays a list of relevant properties. The columns you select appear in the left and right boxes and can then be used to find and identify items more easily. Added property columns are not searchable in add/remove dialogs.
The example below shows a dialog for adding and removing Employees to/from an Org. Unit. The name 'Smith' is entered in the search field, and the two results appear in the Unassigned Employees (left) box. 'Smith, Doug' is selected, and the Add >> button is being clicked. This will add 'Smith, Doug' to the Assigned Employees (right) box.
Add/Remove dialogs are found are used for several functions in the system:
Employees in the Process or Process Set - Selecting an Employee will result in the creation of a Subject Matter Expert for the selected Process or Process Set.
Employees to Share Report Template - Select an Employee to allow the Employee access to a report template. They will be able to generate reports from this template, but do not have access to edit or delete the report template. If the author of the template decides to delete the template, this will not affect your ability to see the generated report. However, you will not longer be able to generate another report based on the template that was marked for deletion.
Experts for Capability Assessment - Select an Employee to set the Employee as an expert for a particular Capability Assessment. This means that when a Learner requests a Capability Assessment, the Learner will be able to send a message to any one of the current Experts. When selecting an Expert, the Subject Matter Expert should be aware of two things: Does this employee have a mastery of the contents within the Capability Assessments? Does this employee have access to Learners in a Supervisory capacity?
Learners from an Organization Unit - Selecting an Employee will result in the Employee becoming Learner in the selected Organization Unit. The employee will be responsible for all of the assigned learning associated with this particular Organization Unit.
Management from an Organization Unit - Selecting an Employee in this case will result in the creation of a Management Employee for the selected Organization Unit. Once an Employee has been moved to the Assigned Employees box, clicking OK calls up the Roles Assigned dialog - allowing you to select Supervisor, Operational Administrator and/or Reporter.
Owners for a Task - Selecting an Employee in this case will result in the creation of a Task Owner for the selected Task. Please note: A Task Owner must also be a Subject Matter Expert for the Process in which the Task resides.
Resources for a Task - Selecting a Resource attaches the resource to the Task.
Tasks for Task Export Category - Selecting a Task will add it to the selected Task Export Category. A Task Export Category is used when exporting summarized learning records. This means that all the Tasks within the Category must be complete for the Category to be complete.
Tasks in a Sub Process - Selecting a Task will add the Task to the selected Sub Process. A Task can appear more than once within the same Process, but it can only appear once within the same Sub Process. Modification of a Task by a Subject Matter Expert/Task Owner will result in the change appearing everywhere the Task is located in the system. Completion of the Task by a Learner results in Completion of the Task everywhere the Learner has access to the Task.
Tasks with Levels in a Sub Process - Selecting a Task with Levels in this case will add the Task with Levels to the selected Sub Process. A Task with Levels can appear more than once within the same Process, but only once within the same Sub Process. Modification of a Task with Levels by a Subject Matter Expert/ Task Owner will result in the change appearing everywhere the Task with Levels is located in the system. Completion of the Competence Levels within a Task by a Learner results in completion of the Competence Levels everywhere the Learner has access to the Task.
Prerequisites for a Task - Selecting a Task in this case will result in the creation of a Prerequisite Task. In Tools > System Options > Task tab, a System Owner can decide whether or not to Enforce Prerequisites. If Enforce Prerequisites is turned on, attempting a Knowledge and/or Capability assessment will prompt an error message stating that a Task Prerequisite is incomplete, and that the request to complete the Assessment has been denied..If Enforcing Prerequisites is turned off, attempting a knowledge and/or Capability Assessment will prompt an information message stating that a Task Prerequisite is incomplete. The Learner will then be asked if they wish to continue with their request. Prerequisites can be enforced for several other completion methods as well.
In the Add/Remove dialogs, there is a Columns feature. When you click on the Columns button, a dialog opens listing the available properties associated with the selected object. Properties can then be selected, and they will be added as additional columns in the Add/Remove boxes. For example, below you can see a Select Columns dialog opened from the Add/Remove Learners dialog. Listed here are the available properties for Learners. Email Address has been selected.
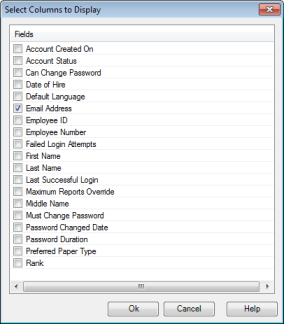
After you click OK, the Email Address column now appears in the Add/Remove Learners dialog. Now you can search for Learners by their name or email address. You can also click on the column header and sort the Name or Email Address columns from A-Z or Z-A. You can add as many columns as you like. To remove any columns, simply click the Columns button and deselect properties.
Note that additional column properties are not searchable in any add/remove dialogs.