|
|
|
|
The Certificate feature allows Employees and managers to view a document that certifies a completed Task. Multiple certificate templates can be added to different Tasks, which allows the flexibility of designing certificates for specific Tasks. For example, a Learner may want to view and print out a full-size certificate to be archived, but they may also want to print out a wallet-sized certificate to carry around as certification. Multiple templates are also useful in cases such a different parts of the company having different needs for certificates—each can have their own layouts in the system.
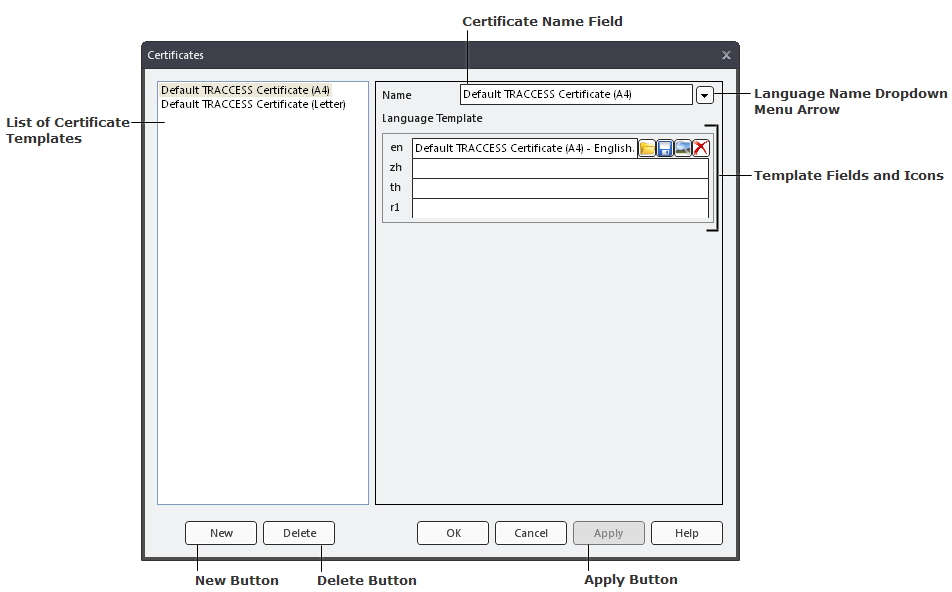
A System Owner (or an Operational Administrator with permissions) can add, remove, and edit certificate templates. Certificates are managed by selecting Tools > System Options > Task > Certificate Template Edit... The Certificates dialog appears, where certificates templates can be added, removed, saved and viewed. Once the templates are added to the system, SMEs can then add these templates to different Tasks.
click image to enlarge - double-click to resize
From the Certificates dialog you can:
Add a new certificate template to the system
Preview a certificate template
Delete/Change a certificate template
Save a certificate template to your local hardrive
Edit or create a certificate template
Any number of certificate templates can be added to the system. When a new certificate template is added, it becomes available for an SME to add to a Task's certificates.
Notes:
If you have multiple languages available in your system, you will see the language codes when you click on the "Name" field dropdown menu and in the Language Template fields. At least one language field must have a name, but all language names can share the same template file; however, you can also add a template file for each language name.
When the "New" button is clicked, it appears that a new certificate is added to the system, but the certificate will not be saved unless the "Apply" or "OK" button is clicked.
Click on the New button.
Enter a unique name for the certificate in the certificate Name field.
(Optional) Click on the language Name dropdown menu arrow and enter a name in each language line.
Click on the  Browse icon and select the template file (.rpt format) from your local hard drive and click the Open button.
(Optional) Repeat step 4 and add a unique template file for each language.
Click the Apply button to save your changes.
(Optional) Return to Step 1 to add another template.
Click the OK button to close the dialog.
To preview a certificate template:
Click on a certificate name from the list of certificates.
Click the  Preview icon.
The certificate appears in the Crystal Reports Viewer.
Note: The deletion is permanent, so you may want to make a backup of this template; this is explained in the next section.
To permanently delete a certificate template:
Select the certificate you want to delete from the certificates list.
Click the Delete button.
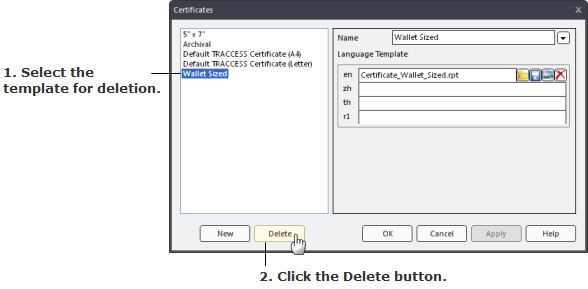
A confirmation dialog appears. Click Yes.
Your certificate name and its template are now deleted permanently.
To change a certificate template:
Select the certificate you want to modify from the list of certificates.
Click on the Language Template line of the template you want to modify.
Click on the Browse icon to change the template file.
Click the Apply button.
Your certificate template has now been modified.
Note: You can also use the  Delete icon to delete a template file. This will delete the template file only and not the template name. If you do not reassign a template file, this template name will still appear in the list of available templates for SMEs and Learners, but when this template is viewed, no certificate will appear.
You can save any certificate template in the system to your local hard drive. This is highly recommended if you are deleting a template permanently, and you want to reuse the file for later.
To save a template to a local hard drive:
Select the name of the certificate you want to save from the list of certificates.
Click the  Save icon. A Save dialog appears.
Locate a place on your hard drive where you want to save to file.
Click Save.
The certificate template file has now been saved to your local hard drive.
There are two certificate templates in the TRACCESS system by default: an A4 and letter-sized. These templates can be edited or you can create your own in the Crystal Reports Designer.
Note: If you do not have people in your company proficient in using this program, contact your System Administrator.
To edit an existing certificate:
Select the certificate from the Certificates List.
Click on the Language Template line of the template you want to edit.
Click the Save icon.
Save the file to your hard drive and open it in Crystal Reports Designer for editing.
When you are finished editing, save the template as .rpt file and follow the To Change a Certificate Template steps.
Creating an original template:
You can create your own original template in any design that suits your company's needs. This can be done in a program called Crystal Reports Designer, so you must have people in your company who are proficient in using this program. Once you have your template finished, save it as a .rpt file and follow the To Add a New Certificate Template steps.
Additional Help:
Adding and/or Removing Certificates to/from a Task
Viewing/Printing/Exporting Certificates
