|
|
|
|
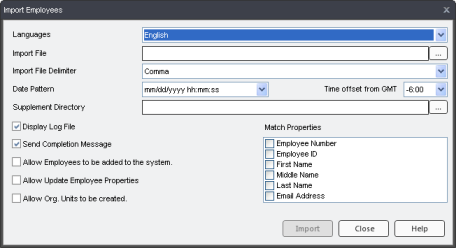
The Import Employees dialog allows you to import personal employee information into the system through a text file.
For detailed information on this function, visit Interpret Import Employees.
For step-by-step instructions, visit Batch Processing: Import Employees.
Languages - Choose a language to import the information from.
Import File - Click the ellipsis button to choose an import file.
Import File Delimiter - Choose a file delimiter, comma or tab—this must match the format used in your import file.
Date Pattern - The date pattern used in the import file. It is important this setting matches the date pattern in your file.
Time offset from GMT - Adjusts the time zone difference.
Supplement Directory - Allows you to browse to a folder on your local hard drive that contains the files that are indicated in the Picture column of your import file. For more info, see Import Employees Legend: Picture.
Display Log File - When this box is selected, the View Import Log appears displaying information about the import after the Import button is clicked.
Send Completion Message - When this box is selected, you will receive an email confirming the completion of your import, along with the log information.
Allow Employees to be added to the system - This box must be selected to add new employees into the system. If there are employees in your import file who do not exist in the system, they will not be added to the system unless this option is selected.
Allow Update Employee Properties - When this box is selected, properties in your system will be overwritten by the properties in your import file.
Allow Org Units to be created - Allows Org Units to be created and employees to be added to them automatically.
Match Properties - The properties you wish to match with your current database information.
Import - Click this button to begin your import.
