|
|
|
|
The information you will require to complete this exercise must be provided to you by the person who created your *.rpt file. You may wish to provide this person with the CI Custom Report Type Template file to ensure that all of the required information is provided.
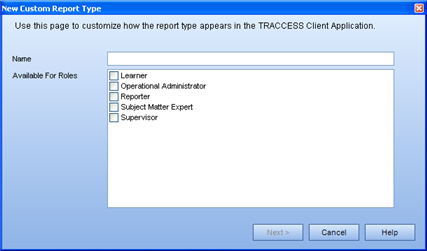
The New Custom Report Type wizard appears. ![]()
The Layout page appears.![]()
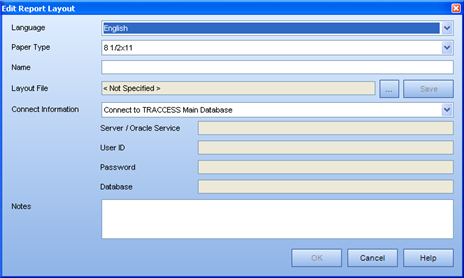
The Edit Report Layout page appears.![]()
If your installation contains more than one language pack, you will have to enter the language of each layout separately - mainly because you will have to attach to different *.rpt files.
If you have international locations, you may want to create a layout that uses A4 and another that uses 8 1/2x11. These must be created separately since they will be using different *.rpt files
If you have a single layout for this report, it does not matter what you enter as a layout name - since the name will never been seen. If you have several layouts for the same report, you may wish to indicate the differences in layout in the name of the layout.
Whoever created the file should have provided you will all of the information required to create the new report type. However, here is a brief description of each connection type.
Use Settings in Crystal Report File - the person who created the *.rpt file indicated where to look (which directory) and what to look for (file name). All you do is select this option.
Connect to TRACCESS Main Database - all of the information required to populate the report is in the main database.
Connect to Data Warehouse Tables - all of the information required to populate the report is in the Data Warehouse tables.
Specify Connect Information - this is the only case where you must ask where the external data source resides. More specifically, you will have to ask for the following:
SQL Database - you will require the Server Name, User ID, Password, and Database name.
Oracle Database - you will require the Oracle Service Name, User ID, and Password.
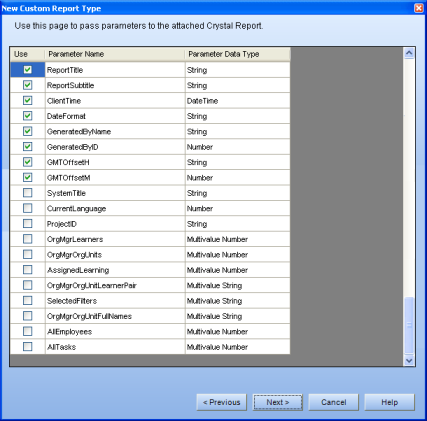
The Parameters page appears.![]()
Once again, the creator of the *.rpt file must indicate which parameters must be passed to the report. If you attempt to generate a report if not all parameters have been passed, your report will generate an error and the icon will look like ![]() .
.
For a more detailed explanation of the use of the parameters, click here.
The User-Defined Parameters page appears.![]() The creator of the *.rpt file must indicate which parameters must be passed to the report.
The creator of the *.rpt file must indicate which parameters must be passed to the report.
The Options page appears.![]() The settings that have been made on the previous pages of the wizard will affect what is shown here.
The settings that have been made on the previous pages of the wizard will affect what is shown here.
The Use Report Filter field will be active if any of the following parameters are selected on the parameters page of the wizard: OrgMgrLearners, OrgMgrOrgUnits, OrgMgrOrgUnitLearnerPair, AssignedLearning. This is because the filters can only be applied to Employees and Tasks, and unless these parameters are selected, the end user will not get the chance to select Employees or Assigned Learning.
Since this is not an integrated Report type, if you wish to create help on this particular report, enter the address for the help information in the help link field.
The LearnerID match property field is active if any of the following parameters are selected on the parameters page of the wizard: OrgMgrLearners, OrgMgrOrgUnits and OrgMgrOrgUnitLearnerPair. If your data source is either the TRACCESS Main tables or the TRACCESS Data Warehouse tables, accept the default. If you are using an external data source, you must select the Learner property that "matches" between information in TRACCESS and the external data source. This would likely be Employee Number or Email address.
The OrgUnitID match property field is active if any of the following parameters are selected on the parameters page of the wizard: OrgMgrLearners and OrgMgrOrgUnitLearnerPair. In the case of Org Units, there is only a single match property: OrgUnit ID. If you are using the TRACCESS main tables or the TRACCESS Data Warehouse tables, simply accept the default. If you are using an external data source, you must enter a field next to the Org Unit name that is the TRACCESS Org Unit ID.
The AssignedLearning match property is active if the following parameter is selected on the parameters page of the wizard: AssignedLearning. The match properties in this case as Task ID or Task Name.
The new custom report type appears in alphabetical order - together with the integrated reports. ![]()
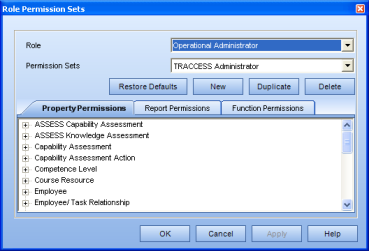
The Role Permission Sets for the selected role appears. ![]()
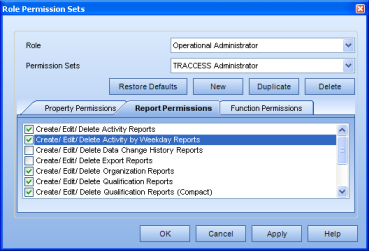
The dialog changes to match the selection. ![]()
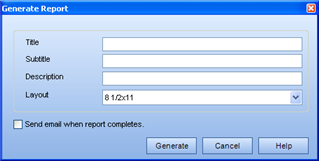
The Generate Report dialog appears. ![]() The Title field is populated with the name of the template.
The Title field is populated with the name of the template.
In the context view, a new report appears in the Generated Reports box. While the report is generating, ![]() appears in front of the report name. This icon changes to a
appears in front of the report name. This icon changes to a ![]() icon once the report is generated.
icon once the report is generated.
|
|
|
|
|