|
|
|
|
The New Data Change History Report Template - Options dialog appears. ![]()
Please note: If selecting specific dates, the From date must occur before the To date to display any results.
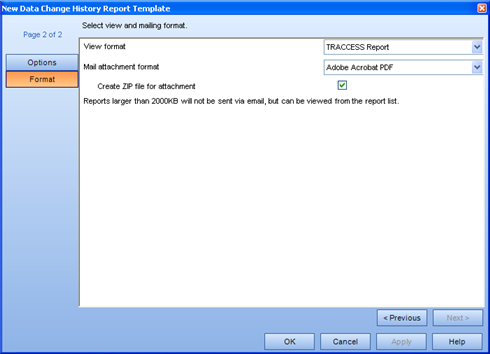
The New Data Change History Report Template - Format page appears. ![]()
This is the format that the report will be displayed within the TRACCESS application. The possible formats are: TRACCESS Report, Microsoft Excel, Microsoft Excel Data Only, Adobe Acrobat PDF and Microsoft Word Document.
This is the format that the report will generated in to be sent to your email Inbox. The possible formats are: TRACCESS Report, Microsoft Excel, Microsoft Excel Data Only, Adobe Acrobat PDF and Microsoft Word Document.
Please note: This will decrease the overall file size allowing you to generate and receive larger reports. However, you may wish to check whether or not attachments with a *.zip extension are currently being blocked by your email system before checking this option.
If the generated report is larger than the value shown in this dialog, you will receive a message indicating the completion status of the report, and that it was unable to include the attachment due to its size. In this case, you can still view the report within TRACCESS, and subsequently export it.
The template will appear in edit mode under the Data Change History heading.
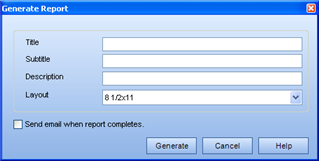
The Generate Report dialog appears.![]() The Title field is populated with the name of the template.
The Title field is populated with the name of the template.
This will appear next to the Report Title in the Generated Reports list. It can also be modified after the report is run.
In the context view, a new report appears in the Generated Reports box. While the report is generating, ![]() appears in front of the report name. This icon changes to a
appears in front of the report name. This icon changes to a ![]() icon once the report is generated.
icon once the report is generated.
|
|
|
|